And here we are, back again! Our journey through the rules of Trench Crusade continues; last time we saw how models activate and how they can perform ACTIONS during the game. Today we’ll take a more in-depth look at what would likely be the most common ACTIONS your models will take in the game: Move and Dash.
Each models has a Movement characteristic in its profile, that is shown as X”/Type.
- X” (commonly 6″) is the “basic” movement value of the model, i.e. the number of inches a model can normally move during an ACTION. This can be modified by various game situations as we’ll see below, for example charging, standing up after being down or crossing difficult terrain.
- Type is the movement type the model has access to, which can be either Infantry or Flying. Infantry models follow all the rules shown below. Specific exceptions for Flying models will be noted. When no such exceptions are listed, then the rules apply to both Infantry and Flying models in the same way.
The Move, Charge and Retreat ACTIONS
The Move, Charge and Retreat ACTIONS are thee of the common ACTIONS available to all models. Whenever a model performs one of these ACTIONS, the model does the following:
- Move: Move up to its Movement value in inches. May not enter or exit Melee Combat range (*)
- Charge: Move up to its Movement value +D6″ in the most direct way possible against an enemy and enter Melee Combat range.
- Retreat: Move up to its Movement value in inches. May exit Melee Combat Range, but the enemies within 1″ of it at the start of the Retreat may make a Melee Attack against it.
(*) Not a game term, but useful for discussion, Melee Combat Range is 1″ or less from an enemy model.
Despite being three different ACTIONS, a model can only perform one of these during an activation: it cannot, for example, do a Move and then Charge, or Charge and then Retreat in he same turn.
Move, Charge and Retreat ACTIONS are the most common exception to ACTIONS requiring a Success Roll or Risky Success Rolls to be performed. Note that because of this, any effect that causes a Success Roll to become Risky (such as the Herald of Beelzebub’s Maddening Buzz or the Shaken condition obtained when failing a Morale Check) does not affect Move, Charge or Retreat ACTIONS, as you won’t need to roll so you can never fail to execute the ACTION.
Regardless of the ACTION taken, there are a set of general rules that always apply when moving. Unless another rule says otherwise, a model that moves:
- cannot enter Melee Combat (i.e. move within 1″ of an enemy) unless it is Charging;
- cannot leave Melee Combat unless it is Retreating;
- cannot voluntarily leave the battlefield;
- can move through friendly models. as long as it is able to clear them completely.
Note that the explicit reference to the possibility to move through friendly models implies that it is forbidden to move through enemies or “neutral” models.
With these restrictions in in mind, let’s see how the three types of movement work:
Move: When performing a Move ACTION, a model may move a number of inches in any direction up to its Movement value. This can be segmented into several parts, as long as the overall movement does not exceed the Movement value of the model, so your model can move around obstacles and up and down vertical surfaces (more on vertical movement later).
When moving, a model can pass through friendly models as if they weren’t on the battlefield, but must end the move in a position where its base doesn’t overlap any models’ bases. This applies to any kind of movement, not just Move ACTIONS. Models performing a Move ACTION cannot, however, come within 1″ of any enemy models at any point during their move, unless they began their activation already within 1″ of those models.
Moving while in Melee Combat: a model in Melee Combat that wants to move cannot Charge and can only (a) make a Retreat ACTION or (b) move by remaining within 1″ of any enemy models it was already in Melee Combat with at the beginning of the move (note that this last option is not restricted to a Move ACTION: it can also be performed during a Dash ACTION).
Moving while staying in Melee Combat is usually done to move around an obstacle that would inflict a penalty to Melee Attacks, or to get within range of an objective to contest it or claim it. This move however must end so that the model is still in Melee Combat with any enemy it was in Melee with at the start of the activation and, since it is not a Charge, it cannot be used to enter in Melee Combat with other models.
Charge: A Charge move is the most common way a model can enter Melee Combat with an enemy. The process for executing a Charge is the following:
- Select one enemy model visible to and within 12″ of the model taking the ACTION as the target of the Charge.
- Roll a D6 and add its result (the Charge Bonus) to the charging model’s Movement characteristic to determine the Charge distance, up to a maximum of 12″.
- Move the model along the shortest and most effective route (i.e. in a straight line, when possible) that allows it to get within 1″ of the target.
- Charges are affected by terrain as normal, so they are slowed down by Difficult Terrain, and may involve any vertical movement if needed.
- If this route forces the charging model to Climb, Jump or move through Dangerous Terrain, the model has the option to follow an alternate route. This however must still be the shortest possible.
- If a Down model stands up at the start of its activation, all movement it makes during that activation is halved. When charging, this includes both the basic movement and the D6 Charge Bonus.
- If the model is not able to get in Melee Combat with the target, the Charge is considered failed, but the full charge distance must nevertheless be moved.

Charging multiple enemy models: A model can only choose a single enemy as the target of a charge. However when the model reaches base-to-base contact with the target of the charge (via the most direct route) it can continue moving, as long as it maintains base-to-base contact with the original target of the charge and it uses the remaining movement to enter within 1″ of one or more extra enemy models (meaning if there aren’t enemies the model can get within 1″ of, the charge ends as soon as the model enters base-to-base contact with the target, regardless of any remaining inches of movement.
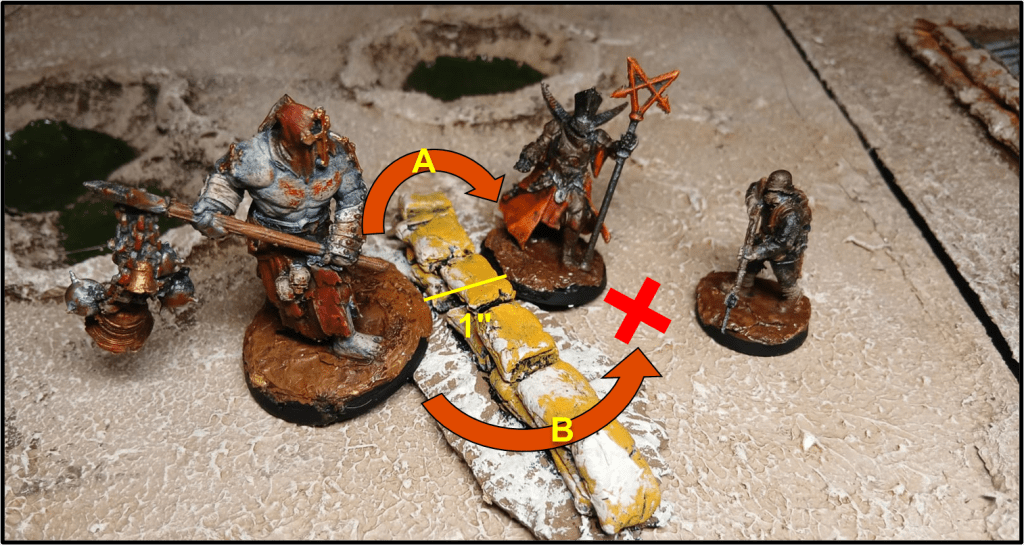
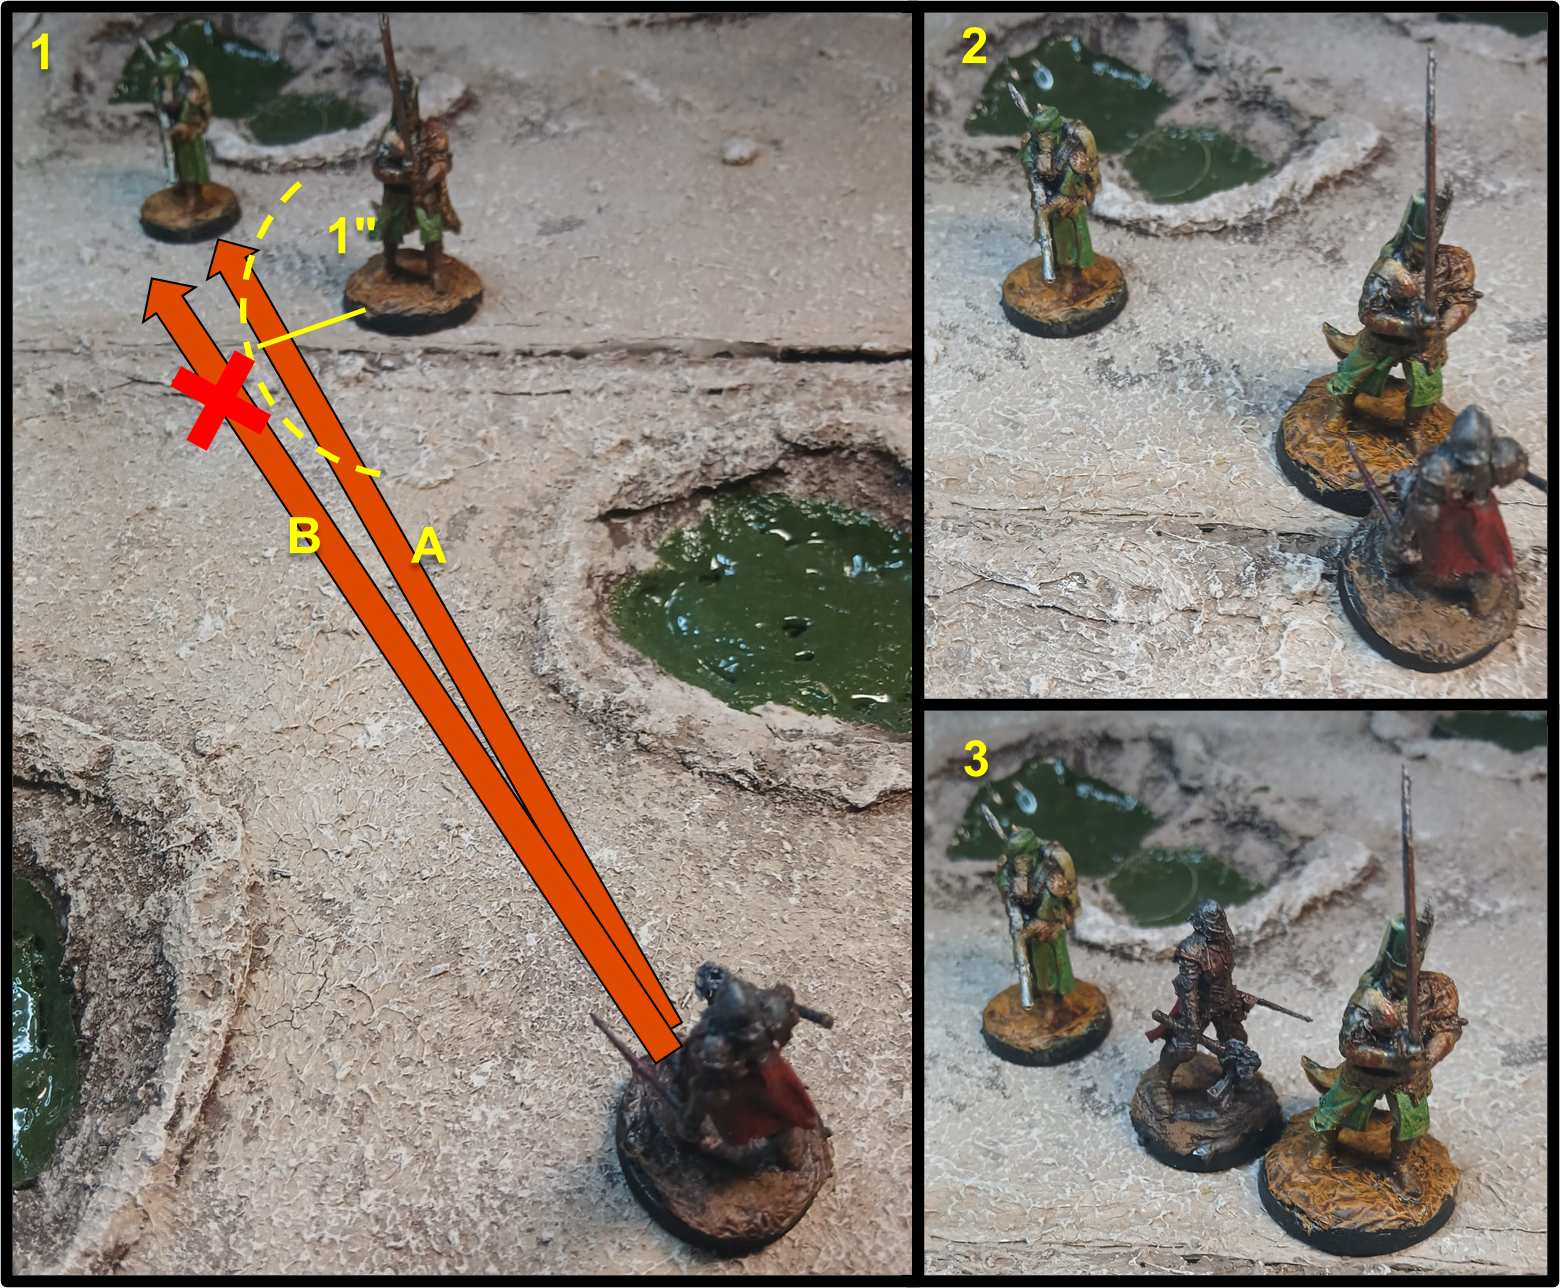
Interposing Enemies during a Charge: When a model declares a charge, it cannot choose a model as the target of the charge if the resulting Charge move would require it to pass within 1″ of a different enemy model before getting into Melee Combat with the Target. In that situation the model would need to either charge the interposing model or not charge at all. This can be exploited by savvy players to protect models that are weak in Melee or in critical positions, for example in the proximity of objectives, as long as they manage to keep other models at a safe distance and prevent the charging model from circling around the target (see Charging multiple enemy models above)
Retreat: A model in Melee Combat has two options: as we have seen above it may take the Move or Dash ACTION and move while staying engaged in Melee. If it wants to leave combat, however, the model has to use its Retreat ACTION.
A Retreat is functionally identical to a Move ACTION, but it allows a model to disengage from Melee Combat (the model effectively must end the retreat at more than 1″ from any enemy). The disadvantage is that any enemy it is in Melee Combat with can make a Melee Attack for free against the retreating model before it has a chance to move. As a model that is taken Down during its activation must immediately end its turn, this means the model would need to avoid the attack or suffer a “No Effect” or “Minor Hit” result in order to retreat.
Special Movement Effects
Some abilities and effects allow models to move in unusual ways, or to move outside their own activation. While each effect is unique and there are no hard and fast rules to cover them all, some common characteristics of these movements may be identified. That said, I would advise you to read each effect’s description carefully, and check the House of Wisdom page to see if any clarification has been given.
Movement granted by abilities: Some special effects, abilities and attacks allow a model to move or to be moved outside its own activation. The description of each of those effects will usually tell whether they will allow a model to enter or leave Melee Combat, and, in the latter case whether the enemy is granted a free melee attack or not. As a general, rule-of-thumb, unless otherwise stated:
- Any effect that allows a model to move away from Melee Combat on its own grants the enemy a free attack only when it is explicitly stated it counts as a Retreat (such as Puppet Master) as the attack is only normally granted in that situation. Thus effects like the knockback from the Infernal Bomb of Artillery Witch or the free movement granted by the Tartarus Claw don’t allow an enemy model to make a free attack.
- Movement effects and abilities can cause a model to enter Melee Combat even if they did not declared a charge. The ability will specify whether the model counts as charging if it enters Melee this way (this can be important for certain effects, such as the defensive ability of Polearms).
Redeployment Effects: Some abilities and equipment allow models to be “placed” directly in a determined spot, usually within a certain range of its previous position. Such effects, which I would call “Redeployment effects” for a lack of a precise game term, follow a few common principles that, even if not explicitly stated in the rules, pretty much every player can agree upon
- A redeploying model is removed from its position on the battlefield and is immediately deployed in a different position, without properly moving across any terrain in-between. This allows the model to ignore the effects of Difficult, Dangerous and Impassable terrain and to climb or jump without the need of a Success Roll.
- A redeploying model that leaves Melee Combat (if the ability allows it) does not cause any free attack from the models in Melee with it.
- Unless specified, a redeploying model cannot be placed within 1″ of enemy models. If it is allowed, the text of the ability will specify if this is considered a charge or not (for interactions with abilities and effect that apply on a charge)
- Abilities that have effect when a model is deployed don’t apply following a model’s redeployment. Usually those abilities are worded so that they apply when a model is “first deployed”, meaning its deployment at the beginning of the battle or entering in play from reserves.
The Dash ACTION
Another movement option available to (almost) every model in the game is the Dash ACTION. This requires a Risky Success Roll that, if successful, allows the model to move as if they had taken a Move ACTION That’s it. No huge shenanigans. Pass the roll, you move. Next topic!
Well… to be fair in all its simplicity, Dash brings a lot to the table and is a critical – if not the most critical – part of a warband’s strategic options.
Being a separate ACTION from Move, Charge or Retreat, it bypasses the rule that prevents a model to take the same ACTION more than once per activation. This offers several tactical advantages:
- It allows models to get in attack range more quickly, thus enabling more attacks during the course of the game;
- It allows faster movement towards objectives;
- It allows models to stay safe behind line of sight-blocking terrain, pop out for a ranged attack and dash back to safety (the so called “peek-a-boo attacks”).
The limitations posed by Dash requiring a Risky Success Roll make it so that the game doesn’t devolve into a big melee in the center or a standoff with both warbands hidden and nobody able to get a shot at the enemy: in order to take a long-range charge you’ll need to Dash first, potentially wasting a model’s turn completely, while for “peek-a-boo” shooting you need to choose: do you want to take a Dash first, risking not to shoot at all but staying in a safe spot in case things go wrong, or do you prefer to have the certainty to make an attack, but risking to keep your model stuck out in the open? The fact that there is no easy answer that is valid in every situation is an example of how a small design decision can provide a lot of tactical depth, at least to me.
With Dash being a crucial part of a warband’s strategy, anything that makes it easier cannot be underestimated. Each faction has at least one model that benefits to +DICE to Risky Success Rolls taken when performing a Dash, either intrinsically or through upgrades:
- Heretic Legions: War Wolves, all models in Heretic Naval Raiders warbands.
- Trench Pilgrims: Ecclesiastic Prisoners, Stigmatic Nuns, Anchorite Shrines with Holy Diesel Engine (St. Methodius).
- Iron Sultanate: Lions of Jabir, Assassin with Thunderbolt of Alamut (Fida’i of Alamut), Homunculus with Startling Speed (House of Wisdom).
- New Antioch: Lieutenant and Shocktropers with Rapid Assault (Prussia).
- Black Grail: Hounds of the Black Grail, Cup of Filth.
- Court of the Seven-Headed Serpent: Desecrated Saint (Wrath), models with Blind Rage (Wrath).
Every warband has also access to Musical Instruments and, in campaign, the Sprinter and Skills and Expertise skills . And don’t forget you can use BLESSING MARKERS to grant +DICE to any ACTION, including Dash, but be always aware that the opponent can – and will often do – use BLOOD MARKERS on your model to hinder your Dashes and other Risky Success Rolls and put a spanner in your works.
Climbing and Jumping
Trench Crusade is at its best when the three-dimensional aspect of the battlefield is at the forefront. Trenches, buildings and other structures not only provide a beautiful scenery and objectives to conquest and defend, but also affect the game rules in a significant way, blocking lines of fire and altering the movement of models.
All movement in Tench Crusade is counted in any direction, including vertical. When a model moves, you measure the effective movement along any surface it moves across. Ramps, stairs, shallow craters and such are considered open terrain and models can freely move and stand over them.
Climbing: When it comes to steep surfaces like walls and ladders, models can move up or down by counting the vertical distance as part of their normal movement. This includes Charges, Retreats and Dashes, with the restriction that the model must be able to clear the entire height in a single ACTION.
If the surface has footholds or other aids meant for climbing, like a ladder or a rope, climbing up or down the surface is automatic. This includes trench walls up to 3″ high, as it is assumed that there’s plenty of supports and climbing aids, and low obstacles up to 1″ high. In these situation you just count the vertical distance moved, as long as the model is able to end the move onto a stable surface that can accomodate at least half of its base. When a model needs to climb up or down a sheer surface, like a wall, that doesn’t offer any footholds, or a trench wall taller than 3″, it must first pass a Risky Success Roll while within 1″ of a vertical surface in order to climb.: If the roll is passed, the model can continue its movement and climb, otherwise it ends its activation adjacent to the wall.

Flying models can climb up or down any surface without the need to take a Risky Success Roll (measure any vertical movement as usual).
Jumping: As part of its movement, a model can jump across a horizontal gap wide up to half its movement characteristic, as long as the total movement made by the model, including the length of the jump, doesn’t exceed the model’s Movement Characteristic. In order to Jump, a model must move towards the ledge and then make a Risky Success Roll to see whether the jump is successful. On a failure, the model falls and it is placed on either side of the gap, as chosen by the opponent. On a success, the model is placed on the other side of the gap (with at least half of the base on the surface at the other side, even if the movement would just be enough to cross the gap).
A model can also jump to a ledge that is higher or lower than its level following the same rules as above. If the model jumps towards a higher level, add the height difference to the total distance of the Jump (thus rendering it impossible in certain situations). if the jump is towards a lower level, use the rules for Jumping Down instead (see below).
Flying models can jump across a gap without the need to take a Risky Success Roll.
Jumping Down: A model can voluntarily jump down a ledge of any height as a part of a move: in that case the vertical distance won’t count towards the model’s movement. If the level difference is less than 3″, the model suffers no ill effects, otherwise this counts as a fall and the model may be injured.
Jumping across a gap towards a ledge at a lower level follows the same rules as a vertical jump down, once the model has managed to clear the gap with the Risky Success Roll.
Flying models can jump down from any height without the risk of getting injured.
Falling: a model might fall from an elevated position for several reasons
- It jumps down from a height of 3″ or more.
- It fails a Risky Success Roll to jump across a gap.
- It goes Down while within 1″ of a ledge. In this situation the model may take a Success Roll roll to avoid falling (note that the model will roll before being effectively put Down, so it won’t apply a -1 DICE penalty to the roll for being Down).
- It is pushed over a ledge by the effect of an ability or an attack, such as the detonation of an Artillery Witch’s Infernal Bomb.
A model that falls by 3″ or more must roll on the Injury Chart and suffer the resultant injury. This roll incurs in a +1 DICE modifier for each full 3″ the model has fallen. Armour applies as usual.
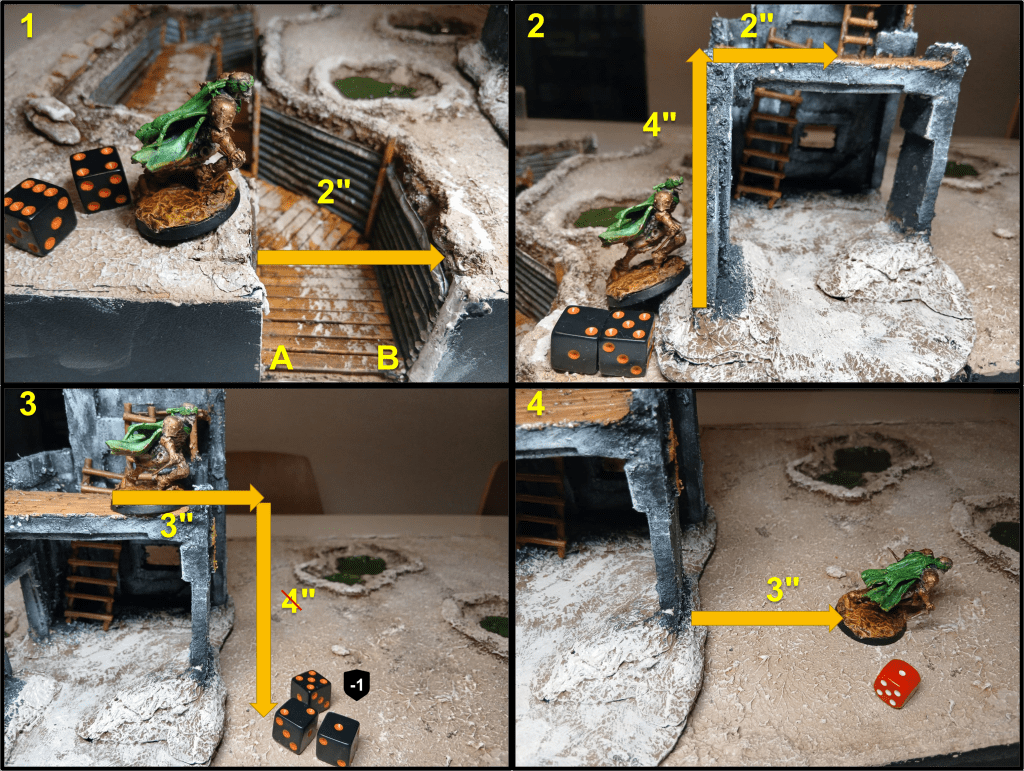
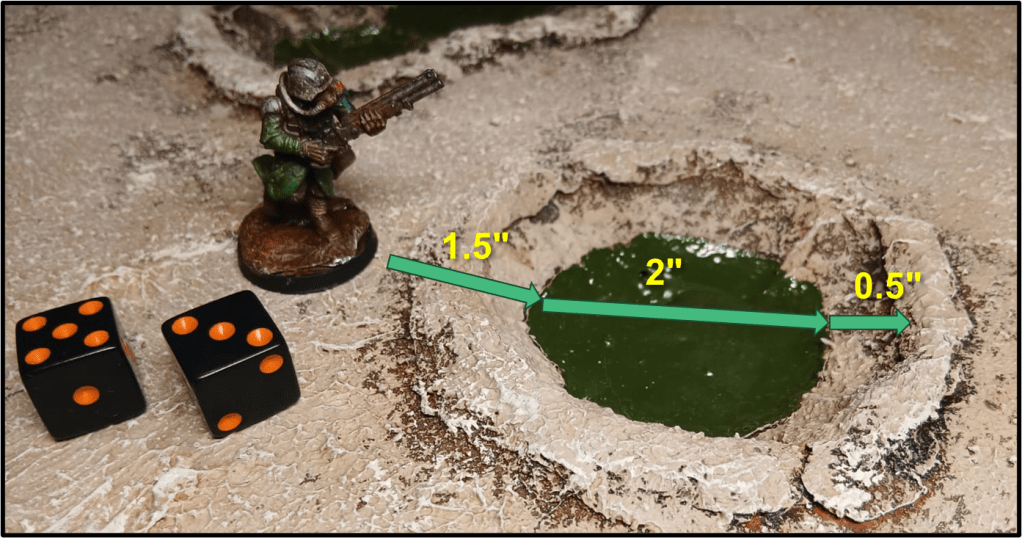
1) The Assassin (movement 6″) takes a Move ACTION, getting to the edge of the Trench and attempting to jump across it. The gap is 2″ wide (less than half its Movement value) so the Assassin can take a Risky Success Roll (which succeeds) to move on the other side, and continue its advance towards the building. Had it failed, it would have fallen either in position A or B, as chosen by the opponent (it wouldn’t have taken any damage however because the trench is 2″ high).
2) Now the Assassin successfully takes a Dash ACTION (roll not shown) and wants to climb on top of the 4″ high building. This requires another Risky Success Roll, which is successful, so the Assassin can move up by 4″ and use the remaining 2″ of movement to proceed ahead.
3) In the following turn the Assassin wants to return to the ground level, it could choose to take a Risky Success Roll to climb down, but it would lose too much Movement for its needs and, on a failure, it would be forced to remain on the top of the building, so it decides to jump down. This way the vertical distance fallen is not counted; However, as the fall is 3″ or more in height, an Injury Roll is necessary. This suffers a +1 DICE modifier (fall of 3″ or more, but less than 6″). The player rolls a 7, -1 for the Standard Armour the Assassin is wearing makes it a 6: Minor Hit!
4) Having survived the fall with just a BLOOD MARKER, the Assassin is free to continue moving forward. It has already moved 3″ before jumping down, and the vertical 4″ dropped don’t count, so it can move 3″ more this ACTION.
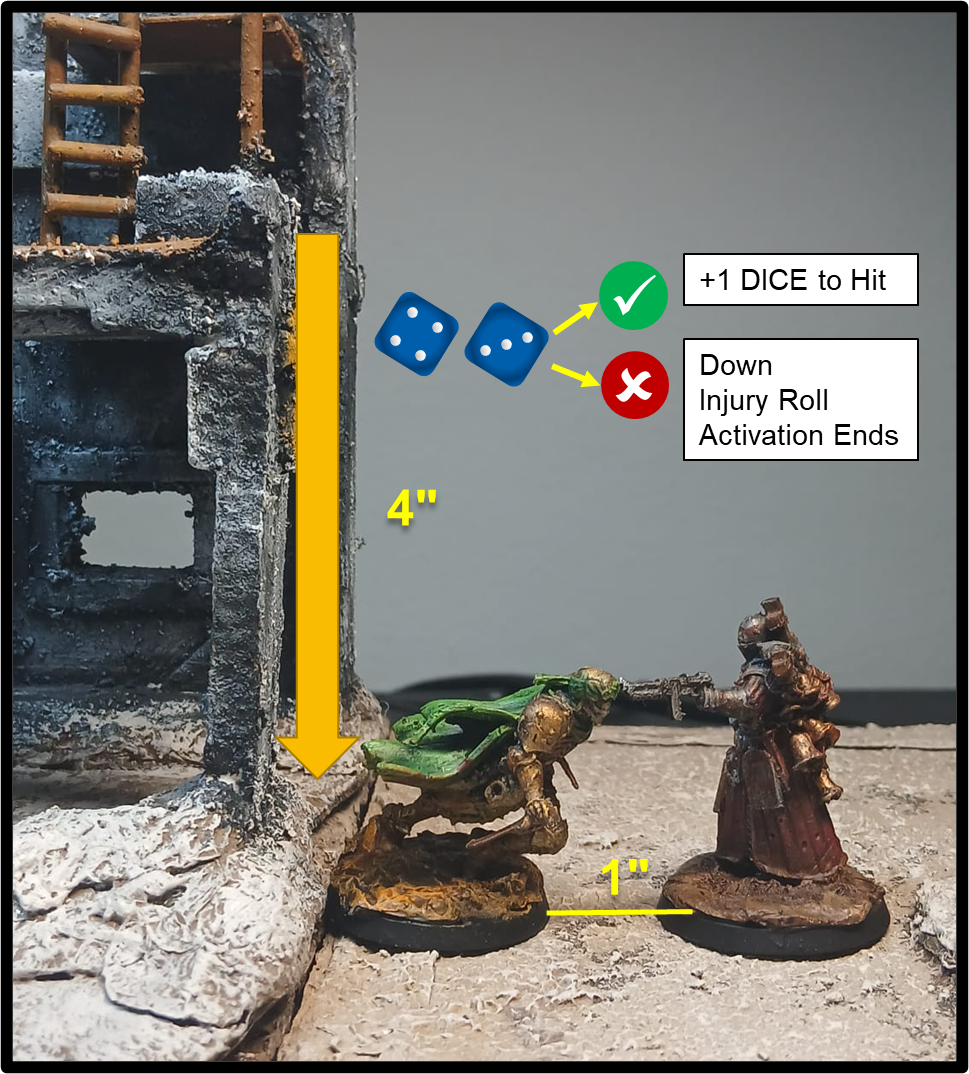
Diving Charges: a charging model may exploit elevation to perform a risky but effective (and to be honest, pretty cool) maneuver called a Diving Charge. This might sound a bit complicated but really it’s not, trust the Troll.
First of all, you need to satisfy the following conditions:
- The charging model must jump down a ledge as a part of the charge.
- The target must be on a surface at least 3″ below the charging model when they jump down.
- The landing point of the charging model must be within 1″ of the target.
If all these conditions are satisfied, a Diving Charge may be declared, and is resolved as following:
- Move the model so that it jumps down within 1″ of the target
- Take a Risky Success Roll.
- If the roll is failed, the model is Down, and it suffers an injury roll as per the rules of Falling described above, thus incurring in a +1 INJURY DICE modifier per 3″ fallen (so at least +1 INJURY DICE). Moreover the model has already been moved into Melee combat before taking the roll so if it somehow survives it will be Down, its activation ended, and at the mercy of their enemy.
- If it’s successful, not only the model has avoided the damage caused by a 3″+ fall, but it will gain +1 DICE to the next Melee Attack the model makes this activation.
Flying models have to take a Risky Success Roll as every other model when they attempt a Diving Charge, however they don’t suffer an Injury Roll for falling, so if they fail the Risky Success Roll to make a Diving Charge they are automatically taken Down and their activation will end, but no additional effect applies.
Downed Models and Movement
We’ll take a deeper look at injuries in a future article but we can’t pass over the Down status too much, as it heavily interacts with movement.
A Downed model must immediately end its activation (if taken Down during its own turn) and cannot move, or be moved, in any capacity (unless otherwise specified, see the Mercy Dog for example), meaning abilities like Puppet Master, a Tormentor Chain or the knockback effect of an Infernal Bomb won’t affect a model who is Down.

It is unclear at this stage whether redeployment effects like the Goetic Power Coveted Position counts as a Move and whether it can be used by a downed model. Keep following the House of Wisdom page for updates.
If a Downed models stands up at the beginning of its activation, all movement it takes during the same activation is halved (during a Charge, this includes both the base movement and the D6 charge bonus). This limitation doesn’t apply when the model is made to stand up by the ability of another model (such as a Castigator’s Enforced Orthodoxy) or equipment (i.e. a Medi-Kit).
Terrain and Movement
Terrain elements in Trench Crusade affect many aspects of the game, such as movement, line of sight and the accuracy of attacks. We have already seen above how the three-dimensional aspects of terrain come into play and interact with movement. In addition, a terrain surface can be classified as one of the following:
- Open: This has no impact on how models move. The majority of flat or low-sloping surfaces, both at ground level or the floors of buildings, are open terrain. Low obstacle, up to 1″ in height, and trench walls up to 3″ in height are considered open terrain as well.
- Difficult: denotes terrain that is hard to move across due to obstacles, debris, narrow spaces and such. All movement through Difficult Terrain costs double so each 1″ effectively moved counts as 2″ of movement instead.
- Impassable: solid terrain like large boulders and walls, or deep pits/chasms cannot normally be moved through. Depending on the nature of the terrain element, they can be climbed or jumped across however.
Any of the above may also be classified as Dangerous Terrain:
- Dangerous: Terrain elements such as barb wire, minefields, areas covered in fire or poison gas are considered Dangerous. When a model starts its activation in contact with or moves over Dangerous Terrain, it must immediately take a Risky Success Roll, ending its activation and suffering an Injury Roll in case of failure (with armour working as usual). If the roll is successful however, the model doesn’t suffer the effects of Dangerous Terrain for the remainder of the move.
Flying models are not affected by the rules for Difficult terrain and only take a Risky Success Roll to avoid taking damage if they start their activation or end their move over Dangerous Terrain (but can otherwise pass through Dangerous Terrain without needing to roll if they don’t start or end the move in contact with it).
Terrain can also affect attacks made by and against models, either by providing cover or defended obstacles (which reduces the accuracy of incoming attacks), elevation (which makes ranged attacks easier to perform) or just by blocking line of sight, thus rendering some attacks impossible to make. We won’t linger too much on how these work, there will be time to tackle further terrain rules in the next article that will focus on how to resolve attacks.
And with that, we conclude our overview of the movement options available in Trench Crusade and how they are affected by terrain. We’re far from over however, there are still more aspects rules to tackle! Hoping that my explanation was clear, I remind you to leave your questions and comments below, if you like. See you soon!


Leave a comment