ARTICLE BASED ON THE v1.6 PLAYTEST RULES – SEE THE UPDATED VERSION HERE
Hello everyone! Welcome back to the Troll’s den. After a general introduction to Trench Crusade, it’s now time to delve a bit more into detail and see how the game works. Fortunately for us, it’s not really complicated, but there are some fine details that can be missed at first read. We’ll start with the basics: how to set up a game, how to activate models and how to resolve dice rolls.
Disclaimer: This article has been written using as a reference the current version of the Playtest rules (v1.6) available for download on the Trench Crusade website. While I don’t expect significant changes in the core rules when the final rulebook goes live, I’m aware there could be some changes. I’ll try to keep everything as up-to-date as possible to avoid providing obsolete information.
A game of Trench Crusade is played across a number of Turns. During each Turn, players will alternate activating all their models until each has been activated once. The Scenario you are playing dictates how many Turns it will last, usually a set number between four and six, with some Scenarios having a random chance of lasting longer.
Game Set Up
Each game is preceded by a Set Up sequence, in which the following steps are performed:
- Players select the Scenario they are going to play. Depending on the situation (campaign or one-off games) there could be rules on what scenario can be selected and which player (if any) chooses.
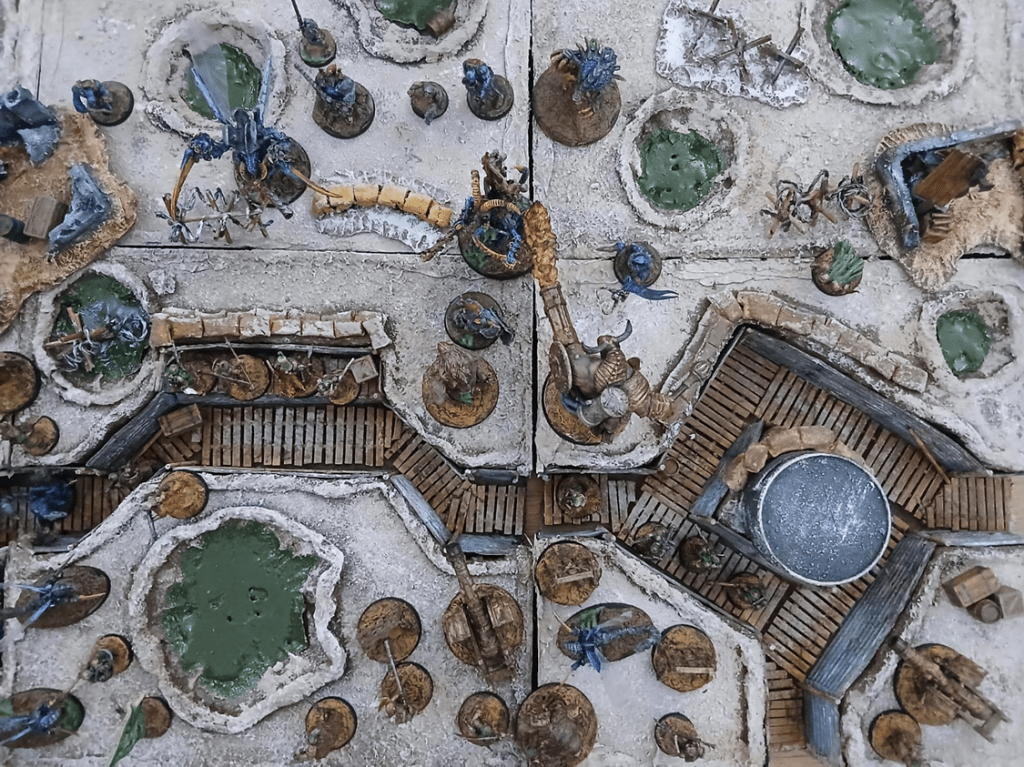
- Players set up the board according to the Scenario rules, adding terrain features that will affect the movement of their models and their line of sight, objective markers and any other item required by the Scenario (some times objectives will be placed after players have picked their deployment zone). Without going too deep into detail about terrain, it’s important to note that having dense boards with lot of cover and areas where models can be safe from enemy fire, particularly in the center of the battlefield, is generally considered a good thing, as otherwise long range weapons tend to dominate the scene.
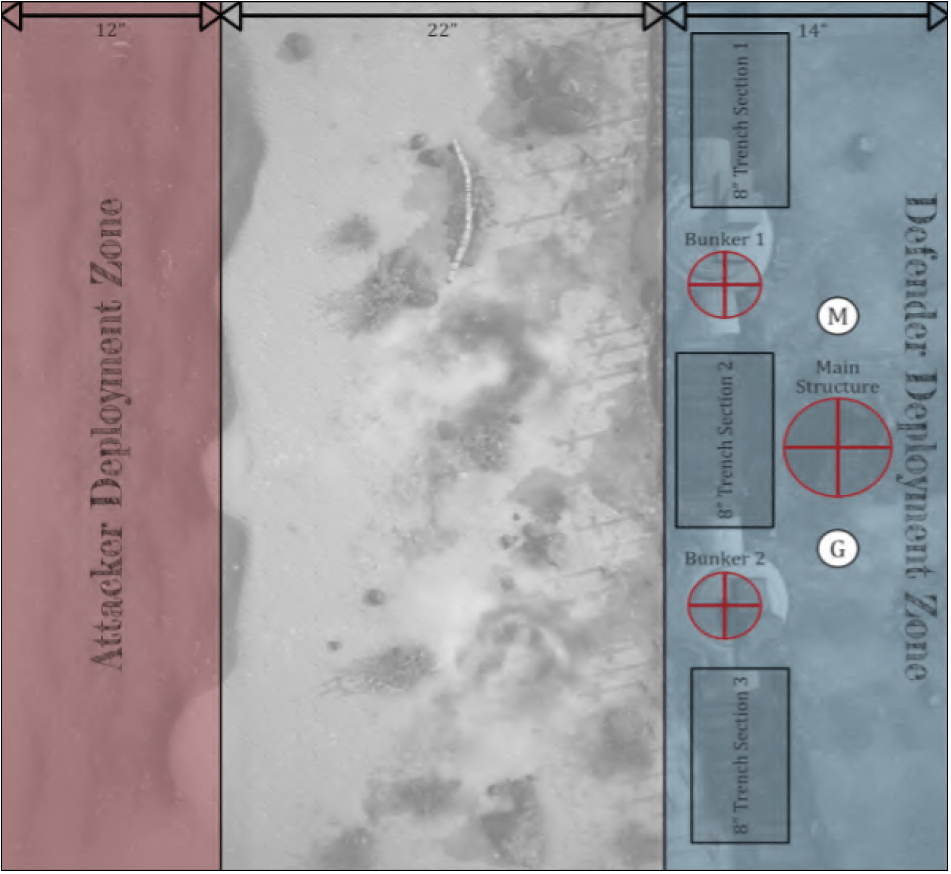
- Players will pick their deployment zone according to the Scenario rules. Some scenarios will have one player as the Attacker and the other as the Defender, with set deployment zones and special rules for each, while in other situations players will be more free to choose their deployment zone.
- Players will choose the models from their warband that will take part in the battle as instructed by the Scenario. Not all scenarios foresee the use of your full warband, sometimes only a set number of models can be used.
- The player who will activate first (which, for simplicity, will be called “First Player”, although this term is not used in the rules) is determined. Unless the Scenario rules say otherwise, the player with the least number of models on their side (or a random player if both forces have the same number of models) will choose.
- Players will have a chance to use Pre-Battle abilities, alternating using one at a time starting with the First Player. Pre-battle abilities are those effects that will take place before the battle, such as loading a gun with Incendiary Ammunition, using Martyrdom Pills or breaking a volunteer on the Catherine Wheel of an Anchorite Shrine.
- Models will be deployed according to the scenario rules. The standard form of deployment is an alternate placement of models starting with the player whose warband is the most numerous, but some Scenarios may present some alternatives, such as some models being forced to enter the battle at the beginning of the second Turn, or only after certain conditions verify. Models with special abilities like the INFILTRATOR keyword can be deployed in advanced positions, unless the Scenario rules say otherwise.
- The first Turn of the battle begins.
The Turn Sequence
Each Turn is resolved as follows:
- Start of Turn
- The player with the lowest number of models currently in play (unless differently instructed by the scenario) will choose who will be the First Player for the turn. If both players have the same number of models, roll-off to determine the First Player (note that, though not explicitly stated, this is ignored in the first round of the game as the First Player has already been determined during Set Up).
- Any effects that happen “at the start of the turn” are resolved. As with Pre-Battle abilities, if both players have effects that resolve at the start of the turn, they alternate resolving them one at a time, starting from the First Player.
- Model Activations: Starting with the First Player, the acting player chooses one of their models in play that hasn’t been activated this turn and activates it, performing ACTIONS one at a time until the model has no more ACTIONS to take, the player decides to end the activation or an effect (such as failing a RISKY ACTION) forces the end of the model’s activation. Then the opponent does the same with one of their models and so on, until each model has been activated once.
- It is possible that one player has activated all of their models while the opponent still has models to activate. If this happens, the latter will activate their remaining models one at a time.
- Morale: Your Warband might need to take a Morale Test to see if they stand and fight or they are forced to retreat due to the casualties they suffered. In many Scenarios, failing a Morale Test will cause the warband to immediately lose the game. Others will be bloody fights to the death and no Morale Tests will be required. Optionally, players could decide that the first failed Morale Test will cause the warband to be Shaken and operate less effectively for one Turn, fleeing only after the Morale Test is failed a second time.
- End of Turn: Any effects that happen “at the end of the turn” are resolved. Several scenarios will have opportunities to score Victory Points at this stage. If this was the last turn of the battle, determine who won according to the Victory Conditions set in the Scenario, otherwise proceed to the next turn and repeat this sequence again.
Actions
When a model in Trench Crusade is activated, it can perform any number of ACTIONS it has access to, in any order, as long as the following limitations are respected:
- The model cannot perform the same ACTION more than once per Turn.
- Unless otherwise specified, all ACTIONS require a roll on the Action Success Chart in order to be executed. The most notable exception is the Move ACTION which requires no roll.
- Each ACTION is completely resolved before attempting another ACTION (with some exceptions, see below).
Note that, as a general rule, no ACTION is mandatory, so it is perfectly legal to activate a model and have it perform no ACTION.
When rolling to see if an ACTION is successful, the player takes 2 six-sided dice (2D6), applies any relevant +/- DICE modifiers (see the section on Modifiers below for details) and rolls the resultant number of dice, totaling the two highest (in the case of +DICE) or lowest (in the case of -DICE) scores obtained. The outcome of the roll is then compared to the Action Success Chart as follows:
- A roll of 6 or less represents a Failure. The model does not perform the action. If the action is RISKY (see below), the model’s turn immediately ends, otherwise the model can proceed in resolving other ACTIONS, if they have any available (but may not attempt the failed ACTION again this Turn).
- A roll of 7 or more is a Success. The model can perform the ACTION as described in its rules. If it was an Attack ACTION, you’ll roll on the Injury Chart to see what happens to the target (Fear not, I will detail how the Injury Chart works in a later article).
- When making an Attack ACTION, a roll of 12 or more is a Critical Success. The roll on the Injury Chart is made with a +1 DICE modifier.
Some ACTIONS are classified as RISKY. When taking a RISKY ACTION you resolve it as normal, but if the dice roll results in a failure (i.e. you rolled 6 or less), the model’s activation immediately ends. Note that when an effect turns an ACTION into a RISKY ACTION (such as the RISKY keyword some weapons have, or the Herald of Beelzebub’s Maddening Buzz ability) you don’t need to make an additional roll to see if you can perform the ACTION, it’s the roll you would normally take that will cause the model’s activation to end in case of a failure. This also mean that ACTIONS that automatically succeed, such as Move, won’t carry any risk of ending your model’s activation.

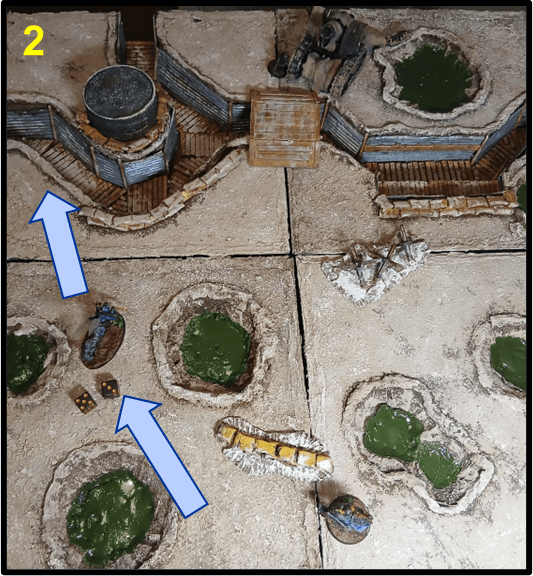

1) Brave Yeoman Geoff (A) is facing a Pit Locust (B) and a Hell Knight (C). It’s the Court player’s turn to activate a model.
2) The Pit Locust activates, taking a Move ACTION to do a Standard Move, which automatically succeeds without the need to roll, and then successfully attempts a Dash ACTION to move a second time.
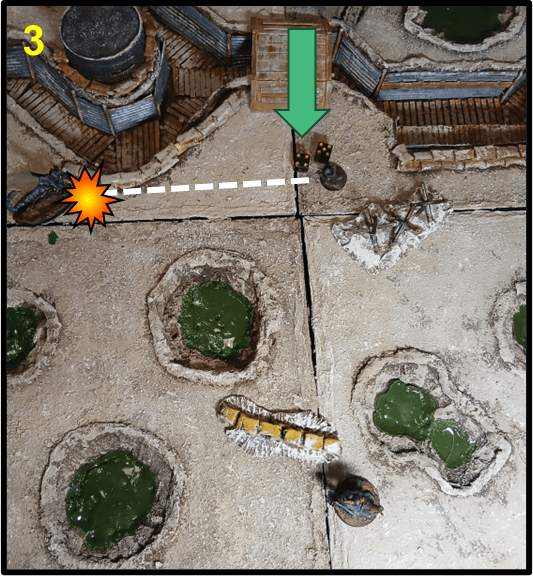
3) It’s the turn of brave Yeoman Geoff. He takes a Move ACTION to move into position, then makes a Ranged Attack with his Bolt-Action Rifle against the Pit Locust. He manages to hit his target, however the armour of the Locust is too hard to crack, and the shot doesn’t do damage.
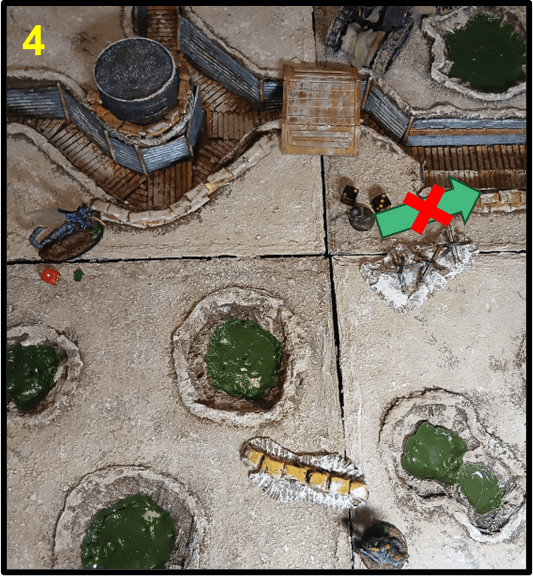
4) Next Geoff attempts to move back with a Dash ACTION, but he is unlucky, rolling only a 5. As Dash is a RISKY ACTION, the Yeoman’s activation is immediately over.
5) It’s finally turn for the Hell Knight to act. It opens with a successful Dash ACTION, moving forward, then it attempts to lob a Gas Grenade at Geoff but misses.
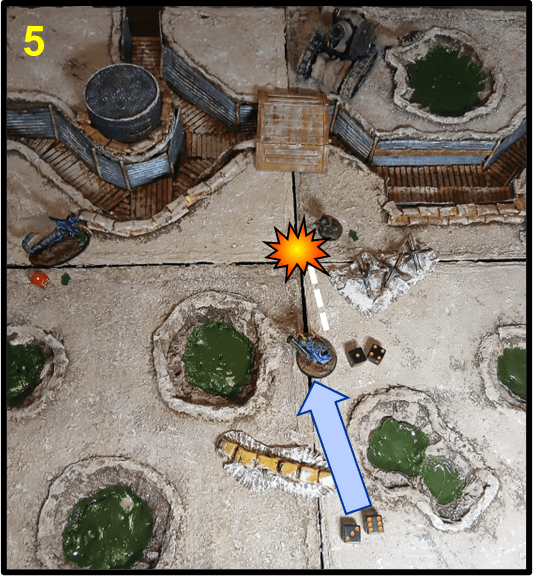
6) As the Gas Grenade has ASSAULT, the Hell Knight can use a Move ACTION to Charge in the same turn, reaching the Yeoman and attacking him in Melee. The Knight’s attack roll is a 12. Critical Hit! Watch out Geoff!
Common Actions all models have access to are movement actions (Move and Dash) and attack actions (Melee and, depending on equipment, Ranged Attack). Abilities, equipment and scenario rules can provide additional ACTIONS that the model can take in addition or instead of other ACTIONS, and can sometimes allow a model to repeat an ACTION they have already taken during the current Turn.
- Move: The Move ACTION allows a model to move around the battlefield. It doesn’t require a roll to be successful. When taking a Move ACTION, the model can choose one of the following options to execute:
- Standard Move: The model can move a number of inches up to its Movement characteristic in any direction, but it cannot move within 1″ of an enemy if it wasn’t already within 1″ of it at the beginning of the movement.
- Charge: Choose one or more enemies within 12″ of the model (needing to roll a RISKY ACTION if it’s not in its line of sight). The model moves towards them a number of inches up to its Movement characteristic +D6, following the shortest, most direct path available. If this movement brings the model within 1″ of the chosen enemies, they are now locked in Melee Combat and can use Melee Attack ACTIONS.
- Retreat: The model can move as if taking a Standard Move, but it can also leave Melee Combat if it started it activation within 1″ of an enemy. When this action is declared, however, all enemies in Melee Combat with the model can make a Melee Attack ACTION against it before it has a chance to move away.
- Dash: This is a RISKY ACTION. If it’s successful, the model moves following the same rules for a Standard Move. As it is a different ACTION than Move, it is not considered a repetition of the same ACTION so it can be taken in the same activation, effectively allowing a model to move twice, potentially interposing other ACTIONS, such as attacks, between the two movements.
When making a Move or Dash ACTION, a model can also find itself in need to navigate across terrain. Unless the model has the ability to Fly, Difficult Terrain will slow them down, while Dangerous Terrain could potentially deal damage. The Climb and Jump ACTIONS are useful tools that will help cross terrain elements without losing too much time moving around them. A model can Climb and Jumping multiple times in the same turn, and these ACTIONS are also allowed during a Charge, but they are not mandatory. If the shortest path during a Charge would force the model to make a Climb or Jump, or to cross Dangerous Terrain, the model could Charge by the shortest path that moves around the terrain instead.
- By passing a RISKY ACTION to Climb, the model can move up or down a vertical surface, spending vertical movement as part of its available movement for the action, but must end the movement on a horizontal surface. If the roll is failed, the model ends its activation just right before the climb, in contact with the surface it intended to climb. Not all vertical surface require climbing, ladders for examples can be moved up or down as normal terrain, and so is climbing out of trenches, as it is assumed they all have fire steps and footholds for the occasion, while obstacles up to 1″ in height can be crossed without rolling.
- By passing a RISKY ACTION to Jump, the model can cross gaps as wide as its remaining movement and up to half its Movement value in height and continue to move. Failure will cause the model to fall into the gap and potentially be injured.
- Ranged Attack: Models armed with ranged weapons can make a Ranged Attack ACTION against an enemy they can see and that is within the range of the weapon. The Ranged characteristic of the model will modify the attack, as well as situational modifiers such as elevation, cover and long range. If the attack is successful, you’ll roll on the Injury Chart to see if the target has suffered any damage. Common limitations to Ranged Attack ACTIONS include the following:
- A model armed with multiple Ranged Weapons can still only use one of them per activation to make a Ranged Attack ACTION. Note however that some rapid fire weapons allow for multiple attacks. In that case, each shots is resolved as a separate ACTION, but no other ACTIONS can be taken between shots.
- A model cannot take a Ranged Attack ACTION and make a Charge in the same activation (in any order) unless it uses a weapon with the keyword ASSAULT. Rapid fire weapons used this way can only fire a single shot in an activation in which the model also charges.
- A model equipped with a HEAVY item cannot make a Ranged Attack ACTION and take a Move or a Dash ACTION in the same activation (in any order), unless it is STRONG. Note that this restriction applies to any HEAVY item, not just HEAVY ranged weapons, so a for example a non-STRONG model equipped with a Greatsword (which is HEAVY) and a Submachine Gun wouldn’t be able to move/dash and shoot in the same activation, even though the Submachine Gun is not a HEAVY weapon.
- A model engaged in Melee Combat cannot make a Ranged Attack ACTION.
- A model can make a Ranged Attack ACTION that targets an enemy engaged in Melee combat, but there is the risk of friendly fire: each attack has a 50% chance of hitting a random friendly model involved in the melee and a 50% chance of hitting a random enemy model.
- Melee Attack: All models can make Melee Attacks, either with a melee weapon they are equipped with or, if they carry no melee weapon, unarmed. Melee Attacks work in a similar fashion as Ranged Attacks, but they will be modified by the Melee characteristic of the model.
- Unarmed fighters: A model with no melee weapons equipped can make an unarmed attack, suffering a -1 DICE penalty both attack and injury rolls.
- Fighting with two weapons: A model equipped with two melee weapons can use them to make two Melee Attack ACTIONS in the same activation. One of those weapons, decided before attacking, will be considered Off-hand and will suffer a -1 DICE penalty to attack rolls.
Actions Modifiers: +/- DICE
All ACTION rolls can be modified by many factors, such as:
- Characteristics and abilities of the model taking the action;
- Weapons, Armour and Equipment carried by the model or the target;
- Abilities of the model targeted/affected by the ACTION or of any other model nearby;
- BLOOD MARKERS and BLESSING MARKERS on the model performing the ACTION (see below);
- Terrain effects;
- Scenario rules;
Regardless of the source, all modifiers to ACTION rolls come in the form of “+ x DICE” or “- x DICE” (also styled as “+xD” and “-xD” in some parts of the rulebook such as weapon profiles) and follow the same rules.
DICE modifiers represent extra six-sided dice (D6) the player can roll in addition to the usual two. The outcome of the ACTION will be determined by the sum of two of the dice rolled, either the two highest (in case of + DICE) or the two lowest (in the case of – DICE). For example, “+2 DICE” can be read as “roll 4D6 (2 base + 2 for the modifier) and sum the 2 highest values”, while “-1 DICE” means “roll 3D6 (2 base, +1 for the modifier) and sum the 2 lowest values”. Note that in the case of – DICE, the modifier dice are still added to the rolled pool.
+/- DICE modifiers are cumulative. If a roll is subject to both +DICE and -DICE at the same time, they cancel each other in pairs and the final modifier is equal to the difference between the two.

Example: a Yüzbaşı Captain makes a Ranged Attack ACTION with a Halberd-Gun (Range: 24″) loaded with Alchemical Ammunition, targeting a Heretic Priest. The Priest is behind a terrain that provides Cover and is 17″ away. The Heretic player wants to ensure the attack has a higher chance of missing, so they spend 2 BLOOD MARKERS that were on the Yüzbaşı to further hinder its attack. The overall modifier to this Ranged Attack ACTION is calculated as follows:
- +2 DICE for the Ranged characteristic of the Yüzbaşı;
- +1 DICE for the effect of Alchemical Ammunition;
- -1 DICE for the target being in Cover;
- -1 DICE for firing at a target at Long Range (more than 50% of the weapon’s maximum range);
- -2 DICE for the BLOOD MARKKERS spent by the opponent.
The total modifier is +2 +1 (-1 x 4) = -1 DICE. The player controlling the Yüzbaşı rolls 3D6 and will need to obtain 7 or more on the two lowest results (as the modifier is negative) in order to hit. The Sultanate player rolls 3 dice, obtaining a 2, a 3 and a 5. The two lowest results sum up to 5: miss!
Blood and Blessing Markers
Wounds, fatigue and trauma a model accumulates during the battle are represented by BLOOD MARKERS. We will describe more in detail how BLOOD MARKERS are gained and used in a future article, what is important for today’s discussion is the fact that when a player wants to take an ACTION with a model, their opponent can use Blood Markers on that model to hinder the action. Before rolling for the ACTION, the opponent can declare if they want to use BLOOD MARKERS this way and how many they want to use. Those markers are discarded, and each is converted into a -1 DICE modifier to the ACTION roll.
Much less frequent than BLOOD MARKERS, BLESSING MARKERS have a similar but opposite effect, representing a morale boost, blind faith, chemical enhancements or a supernatural intervention. When performing an ACTION with a model that has any BLESSING MARKERS, the player controlling that model can, before rolling, discard one or more of those Markers to gain a +1 DICE modifier to the roll for each marker spent.

House of Wisdom: Should a model have both BLOOD and BLESSING MARKERS, the opponent would need to decide first whether to spend any BLOOD MARKERS on the model and how many. The active player will then have the chance to spend their BLESSING MARKERS to improve the action.
Morale and the End of the Turn
We covered pretty much everything that happens during a Turn; in future articles we’ll discuss in detail how the various ACTIONS work and interact together. Before leaving, however, I need to address what happens after every model has been activated.
Before the end of the turn you’ll need to check whether your warband is required to take a Morale Test: if more than 50% of the models in your warband are still standing, no test is required and you’ll be able to fight for another turn.
However, if 50% or more of the models in your warband are Down or Out of Action, you need to take a Morale Test. This is an ACTION that is not performed by any model in particular (so it cannot be modified by BLOOD MARKERS or other effects, except for those who explicitly affect Morale). If the test is successful, nothing happens. On a failure, however, your warband will retreat from the battlefield and you’ll lose the game.
Players will perform Morale Tests starting from the smallest warband (*), so it is possible that the smallest warband flees before the opponent takes the Test.
As an optional rule, players can agree that the first failed Morale Test causes the warband to be Shaken for the next turn rather than flee outright. During a turn in which a warband is Shaken, it treats every ACTION it takes as a RISKY ACTION (remember that ACTIONS that automatically succeed, like Move, don’t need a roll, even in this situation). After one turn, a Shaken warband will return to function normally, but should it fail another Morale Test it will be forced to retreat.
(*) Note: in the current version of the rules – Playtest v1.6 – it is not specified what happens if both warbands have the same number of models. I presume you’ll roll-off like when you determine the First Player, but this is my interpretation and has to be taken with the due care until a clear official ruling is given.
And with that, I think that we covered everything we needed to in order to get a basic rundown of the game sequence and actions. Thanks for staying with me all along. There are some details missing but, as mentioned, we’ll get back to them in future posts. Next time we’ll talk about movement and terrain. Until then, heads down and watch out for Infernal Bombs!
P.S. Thanks to Lx from the Trench Crusade Discord Server for reviewing the draft article and providing suggestions.


Leave a comment